This and That

Saturday, January 30, 2016

A Need to Drive

Sometimes, after spending a couple days indoors watching it rain, and I don't mind the rain, but 3 days is a bit more then I can stand, I have to get out and ride.  Yesterday was one of those days.  I made a 50 mile "block" lol.  Here are some scenes on my drive.  Sit back and relax... I had the wheel ....

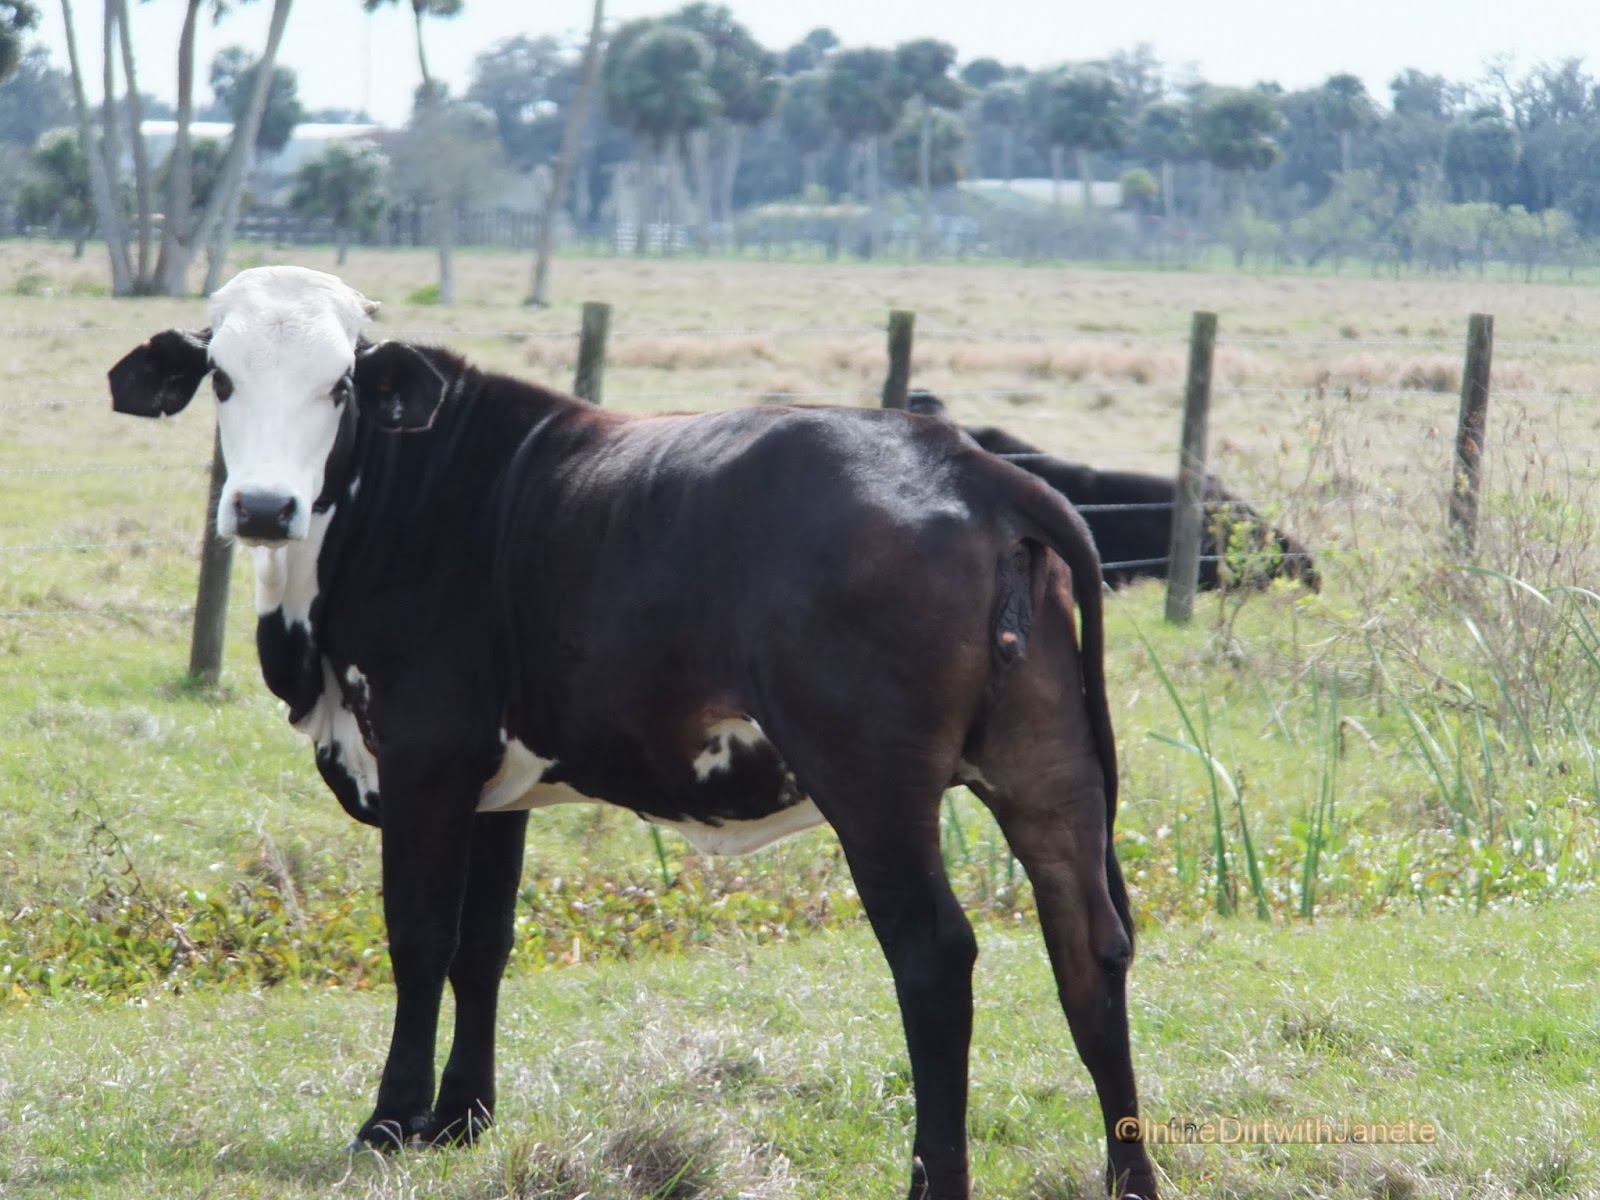
Once I got up the road a ways, I went to the right - heading east.  It was a bare lonely road and then I came up on this field of cattle.  I don't know what kind they are but they came in all colors.  And all seemed quite interested in why I had stopped to take their pictures. lol.


His face has the sweetest look.  With the white stripe on his head. I say he, it could have been a she.

And down the pasture a ways,  She was a pretty one with an all white face and black body. Her white fur on her chest area almost had a look of soft cotton.


These 2 seem to be using the power pole anchor lines for a behind scratcher.  I should have turned on the recorder.  They were quite comical scratching back and forth on the lines.

I belive this guy (and I'm quite sure it's a guy) got himself stuck in the mud.  I wanted to help but every now and then that logic part of me kicks in.  I did not go in.  He's on his own till they're owner comes out.  Sure hope he was okay.


And around the bend.  I love traveling roads that I've not been down.  It was exciting to go around the bend and not know what was up ahead.  I know, it doesn't take much to excite me.  My husband thinks that is a good thing...grin.....

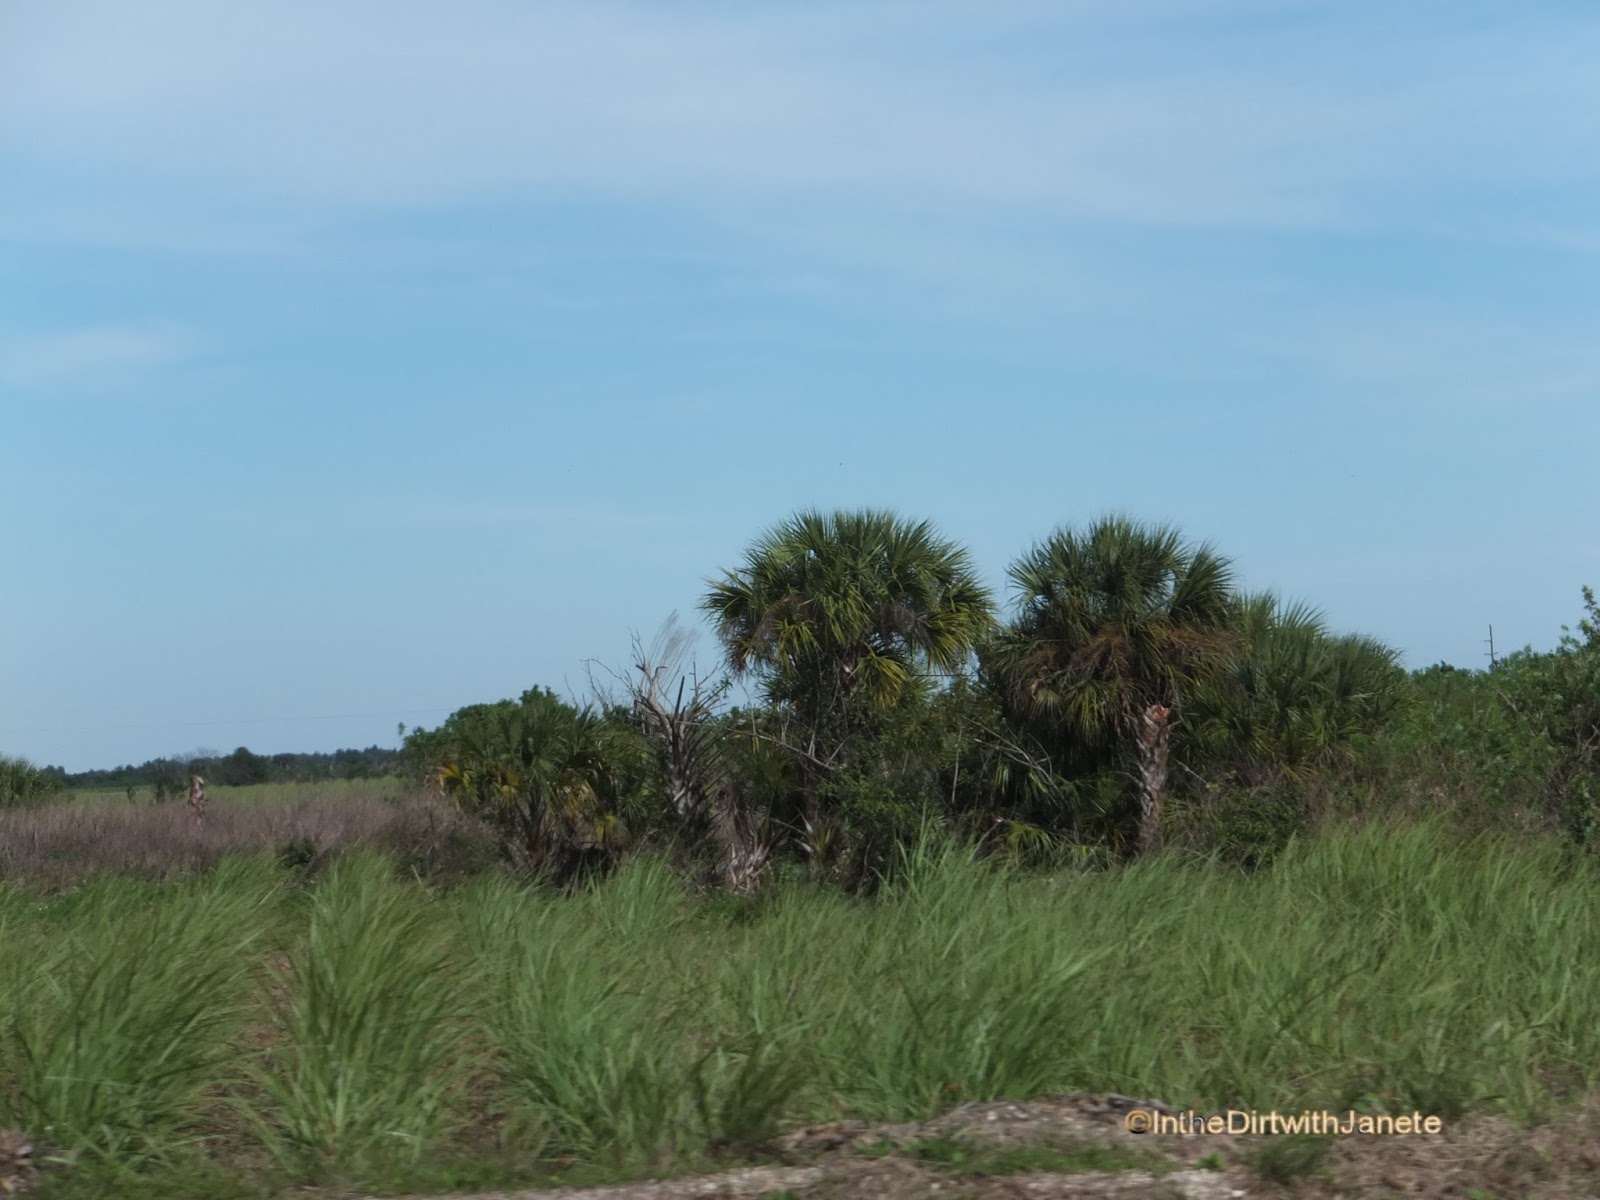
I thought this was pretty.  A circle patch of palm trees in the middle of nowhere.  They are native to this area.

                                         Up close and personal look at it.  Nice and peaceful.


This next picture is sugar cane in bloom.  US Sugar owns most of this land and produces a large portion of our sugar.  We lived in Louisiana and I know that much sugar cane is produced there as well.  Ever been lost driving through a cane field..... I can attest that it is not fun.

And a field of the younger crop.  Sugar cane requires a lot of water and these irrigation paths are put in.

And the road to get back home.


Sometimes it's necessary to get out and explore new things.  Even if it is a cow pasture, palm trees and sugar cane.   Enjoy the magic!!!  It's everywhere, if you take the time to look.


Thursday, January 28, 2016

A Picture Tutorial of a Small Fairy Garden

I showed you how to make a fairy garden fountain and the videos of creating a fairy garden against an existing structure.  Today I thought I would share the first fairy garden I made.  It all began quite by accident.  I was going to make a planter for a bonsai tree.  The foam fell, lesson 1. don't pile it too high, and the idea of the fairy garden was born.  This first picture is the foam without any detail.


I know, my husband said the same thing, it looks like a cake with run away icing...lol.  I spray painted it and thought the little area to the right would made a great "pond" so this next picture shows how I painted it.


Starting to look like something.   Then I took some colored glass and a little bridge and made my pond.


You can see that I added a gnome, a door, and window on the front.  I have a picture, following, showing that up close.


I then built a "park" on top, added my bonsai and a wizard and walla....a new fairy garden.


I hope this gives some incentive to give it a try.  I found, in shopping, that the cottages and houses are very expensive and you still have to build the garden around them.  By using the foam, I've learned to incorporate it all into one.      Enjoy your day and be sure to look for the magic!! It's everywhere!!!

Tuesday, January 26, 2016

The Miraculous Moringa Tree


Years ago I was visiting our local Eco nursery and saw a film on the Moringa Tree.  This tree is called miraculous because it is rich in nutrients and the healing properties it possesses.  The Moringa is grown in 3rd world countries to aid in nutrition.  All parts of the Moringa tree are edible.   I use the leaves in salads.  I don't tell my husband they're in there because it would discourage him from eating the salad...lol.  Mainly because I picked them off a tree he doesn't see as edible.  The leaves of the Moringa have 10 times the vitamin A of carrots, 17 times more calcium then milk, 25 times the iron of spinach, 15 times more potassium then bananas and 12 times more vitamin C then oranges.  They also are high in protein and fiber.  The high fiber content has proven to help with digestive problems.  I've read that the leaves are hard to harvest but I don't find that true.  As long as they are low enough to reach.  You'll see the limbs towards the bottom of mine is almost bare.  It's because we eat the leaves.  The Moringa has also proven to lower blood sugar levels because it contains Chrologenic Acid which causes the cells' to slow the absorption of sugar.  The leaves are used to make tea, which I find taste good. I also add a little honey to it.

I recently had to move mine as in one year it shot up to 15 feet and was scratching against the window.  The roots were very large so I had to work to get them out but it is now in an area that it can grow as large as it wants although, once it gets settled from the transplant, I will cut it down to about 5 feet to encourage new stem growth and I can once again reach the leaves to harvest.  A couple pictures of the move are shown below.  I used a good garden soil to fill the bottom of the hole and then mixed some water with rooting hormone to help prevent shock.

If you can obtain seeds and they can be bought at various places online - cheep - I would recommend doing so. I found them very easy to get started.  It's a pretty tree and also will provide a great, nutritious addition to your salads.  Or try to purchase a young tree.  The Moringa grows well in warm areas.

 I used a good garden soil, mixed with the dirt I dug out of the new hole.


A mixture of rooting hormone was added to water to help prevent shock and encourage new root growth.  I then put mulch around the base of the tree.
 Once it re-establishes it's self, I will cut 2 of the 3 larger limbs to encourage new stem growth down lower.

Thank you for visiting inthedirtwithjanete and I hope you'll come back to see what dirt I've gotten into next. If you have any questions, please leave a comment or email me at inthedirtwithjanete@gmail.com.   Enjoy the magic.  It's everywhere.


Monday, January 25, 2016

Another Unique Fairy Garden Fountain Build Tutorial through Pictures


I was asked to build a fountain for a friend to put in her consignment shop.  She didn't care what it looked like. She just wanted water flowing.  I had an old aviary that was used for finches.  So, I took it apart and reused the wood and screen.


I had an old piece from a fountain that at one time was used in a corner of the yard.  Through landscaping and planting, the fountain was disassembled and other parts used elsewhere.  This piece was left over.


I built the wood into a frame for the water fall and mounted the old fountain piece onto it.  I used a drawer from a plastic filing cabinet to hold the pump and water.  I then fed the tube from the drawer up to the top of the "water fall".  The water will circulate from the bottom to the top and down the falls.


I then put the screening around the entire fountain and started foaming.  This process took about a week as the foam has to be done in layers so that it will cure before additional layers can be applied.


The inspiration for the design came from this dragon I had in an older fairy garden.  He would be the main piece at the top of the fountain - where he has all the jewels of the kindom...Lol.
 And the foaming is completed and ready to paint.


As with all my fountain and fairy gardens, there is a bridge to cross the river.

 The painting is completed and the fountain is ready for the "kingdom" to be put into place.

 The aforementioned dragon nestled on his jewels.
 I added silk and plastic flowers and moss.  There are gnomes going up a ladder to get the jewels from the dragon.

 Fairies and doors and sitting areas and another bridge.

 And the end of the river flows into the "water holding area".
 And more decorations along the side to give it a rounded out view point..
 The finished product.

3 years later, it has held up well and this is it's permanent home under the house.  It's a magical piece for our grandchildren and us.   I hope you "take the plunge" and give it a try.  Spray foam in a can. Who knew!!!!

Saturday, January 23, 2016

A Unique New Crafty way to Build a Fairy Garden

I have 5 videos of how to build a fairy garden, from start to finish, with foam in a can.  I use Great Stuff.  The painting video is still being "processed" but as soon as it's finished, I'll share the link. In the meantime, other then painting, these give you a good view and I posted the you tube link for the painting.   I hope you take away some excitement to try this yourself .....


Video 1 shows putting the foundation down and starting the build Video 2 is more of the build This is the link for the painting. I don't know why, but I couldn't find the code to put it here. Just copy and paste this link It should work. https://www.youtube.com/watch?v=60WB_5lsj_4


 This video is of the decorating And a night time view I hope you enjoyed this tutorial. Thank you for visiting my blog!!!

Wednesday, January 20, 2016

A Must for Fern Lovers - The Staghorn Fern

 
 The Staghorn Fern is a member of the Polypodiaceae family. You can see the shape of the leaves look like horns of a deer. Thus the name Staghorn.  It's common to the Philippines, SE Asia, Australia, Africa, Madagascar, Indonesia and America.  There are several types of Staghorn from "easy to grow" to the "only for the experienced grower".  Mine are the easy to grow type.  I find them to be a statement piece in any garden.  Staghorns do not like to be smothered in dirt.  They receive their moisture and nutrients from the air and rain.  They will grow on trees, branches and even rocks.   The top picture is a Staghorn that I have growing at the base of a tree in my shade garden. The Foliar fronds (fertile fronds) reach 3' high. The Foliar fronds produce brownish fronds called sporangia on the underside.  The sporangia hold spores which will produce new plants, when germinated. Spores can be scraped off and put into a plastic bag (for the humidity) and grown into pups. I've never done that so I won't go into telling you how.  I wait for new pups to form on the plants. When a pup (small fern) forms, they are easily cut off with a sharp clean knife - making sure to obtain the "root" of the pup. The roots are very hard to see but if you make sure to cut a good 2-3 inches under the pup - you'll most likely get them.  Secure some wet peat moss, compost or very rich potting soil  to a board or large tree bark or a branch. I use zip ties to secure this and make sure it is very wet so you can keep it all together. Then mount the fern to that - again I use zip ties.Keep it in a shady place for a good 2-3 weeks.  Don't use anything sharp - like copper wire- as it will cut into the plant and cause disease. The Basal fronds (sterile) are what attach them selves to wood, peat, trunks and hold the plant in place. It is at the bottom of the plant.  Staghorns also do well in baskets - filled with a good peat moss - the longer the moss the better as it holds and distributes moisture over a period of time.  Smaller cuts of moss will dry out too fast. Hang the basket sideways for a prettier display of your new plant.  Staghorns do not like to be kept real wet. They will rot and die. But they do need a good humid spot to encourage the fern to grow. As the fern grows it will build a 360 degree full fern with many plants growing through and out of the moss. It will take time but it is very rewarding for the patient person.
                                              Above is one growing on a tree trunk
           Above is one growing on the ground and shows small pups coming up in the center.

 Staghorns grow well, outside, in zones 9-11 but can be grown as house plants in colder climates.  Just make it a habit to mist them at least 2 times a week.  While they don't like to be soggy - they do need the humidity.....or twice a week - put it in your bathroom and run a hot hot shower to steam the room.  Your fern will love you for it and reward you with lush new growth.
 Above is a pup that will be cut and mounted.  I will do a short video when I do this in early spring.
Another pup that will be cut and mounted. 

Staghorns like partial shade and do not like cold temps.  This type of Staghorn can stand temps to 30 degrees.  It is the Bifurcatum.  Fertilizer should be given monthly during the growing season (warm months) at a rate of equal parts - that is 10-10-10 or 20-20-20.  They also love banana peels. During non growing months fertilize at least once a month or give it some banana peels. 
One disease of the Staghorn is black spots.  It is called Rhizoctonia Fungus.  If you see this,stop watering the plant and let it dry out completely. Only give it water when it starts to wilt and do so sparingly.  If you are in a moist climate - bring the plant to a dry place. Over watering is most likely what caused the fungus to grow.  Use of a copper fungicide will stop the spread of the fungus but it won't cure the fungus. Follow the instructions on the container as they each have their own measurements of use.  I cut the leaves off that have the black spots.  I've only had it twice and both times we had days and days of rain which likely caused it.  If you see mealy bugs or scales, use a non oil based insecticide.  This will kill the pest.  Anytime you bring a new Staghorn into your yard, keep it isolated for a minimum of 2 weeks to make sure there are not pests that will spread to other ferns.  I do this with all my plants.  Being safe is better then being sorry.  

  I hope you've enjoyed my "dirt" for today.  I'm off to begin the video of building a fairy garden with "foam in a can" I hope you'll check into to see that Friday.    It's a 2 days process and today is the build.                    
                                                                       

Friday, January 15, 2016

The Beautiful Winter Starburst

On of my favorite shrubs in the yard is the Winter Starburst aka Fireworks Flower or the proper name Clerodendrum Quadriloculare.   Yes, I prefer the first 2 names as well. LOL.  This wonderful shrub is fast growing and can be left to grow to heights of 20 feet or kept as a shrub.   It's a native of New Guinea and the Philippines and since arriving to Florida it has become a favorite in many landscapes. It's also makes a great high hedge plant.  The one in my yard is just starting to grow it's buds. I'm taking daily pictures to show the full progression of bud to bloom and will share that when it's complete.  It can thrive in full sun or partial shade and does best outdoors, year round, in zone 10.  They also can be grown as container plants and brought inside or wintered in a green house.  Late winter to early spring is the bloom time making it a wonderful pop in the yard during our winters.   I fertilize 3 times a year, spring, summer and autumn and use bone meal throughout the year at various times.   When pruned the shrub becomes quite full.  They can be invasive if not properly looked after. They shoot out suckers from the parent plant which if you only want one as a showstopper, they should be pulled up as soon as they are seen. Cuttings are easily obtained on new, non woody growth,or pull a small sucker out and replant it. This is truly one of my favorite plants in my yard.  A few pictures, following, show the large flowing flowers of purple and white and the height of 2 that were left to grow as trees. During the non bloom season this shrub has it's own beauty with deep purple on the underside of the leaf and deep green on top.  I hope you enjoy their beauty.

                                           The stunning blooms of the Winter Starburst


An eclectic mix of trees with the Winter Starburst thrown in

               This was a stand alone to show it's beauty and when I saw it I stopped for a picture.

I hope you enjoyed my share for today.  I'll not be posting on the weekend but please be sure to check back to see what dirt I've gotten into come Monday.  Enjoy the magic!! It's everywhere!!